
Get Online Students Using YouTube
Did you know that YouTube is the 2nd biggest search engine after Google? Every day, millions of people are searching for videos about anything you can imagine and that includes online tutoring. As an online tutor, this is a huge opportunity for you to promote your tutoring services and the best thing is, you can do this for free.
More...
Here's what you'll need to get started:
YouTube Account
When you sign up for a Google account, it also comes with a free YouTube account
Click here for a quick tutorial about how to sign up for a Google account.
Microphone
You can use the built in microphone on your computer. But for better sound quality, I recommend an external microphone or a set of headphones with a mic
Video Editing Software
You don't need a camera to create a professional looking video. All you need is to download some video editing software to your computer
I've got a quick question for you before we get started. Does recording a video of yourself and uploading it to the Internet make you feel like this:

One of the biggest things that can hold you back from making your own YouTube video and promoting your online tutoring services might be the fear of having your face on the Internet. I know how that feels. When I made my first promotional video, it took me a while to pluck up the courage to click the upload button after recording. But I found that once I got over that initial fear of what other people would think, I actually started to enjoy creating YouTube videos and got lots of positive feedback from my students. When my videos started to bring in paying customers, I soon got over my worries and now it's not a problem.
Screencasts
With that said, if you'd rather not feature in your own video or don't have a way to record yourself, then one of the best alternatives is to make a screencast. A screencast is a recording of your computer screen. For example, the video tutorials in this blog post are screencasts of what I am doing on my computer. You can either record your voice and show a still image (like a Google slide) or record and narrate what you are doing on your computer screen (e.g. a how to video). You can very easily create professional looking screencasts to demonstrate your tutoring style, give a free lesson or promote your services with a video advert.
Here's an example of one of my screencasts I did for teaching some of the differences between British and American English. This is a free video lesson that encourages students to contact me and book an online lesson. I used a Google Slides presentation and recorded my voice over the top:
To record this video, I used Screencast-O-Matic. There is a free version of this software but you are limited to 15 minute recordings and your videos will show the Screencast-O-Matic watermark. I opted for the paid version (which is only $15 for the whole year) which includes unlimited length recordings, no watermark and the ability to edit your videos. The edit tools are very handy and definitely worth the extra 15 bucks in my opinion.
There are other options out there that you can use to record and edit your screencasts. Two of the most popular are Camtasia and Screenflow (both have a one off fee of $99.). They have more features than Screencast-O-Matic but are more costly.
Quick recording tip for visuals:
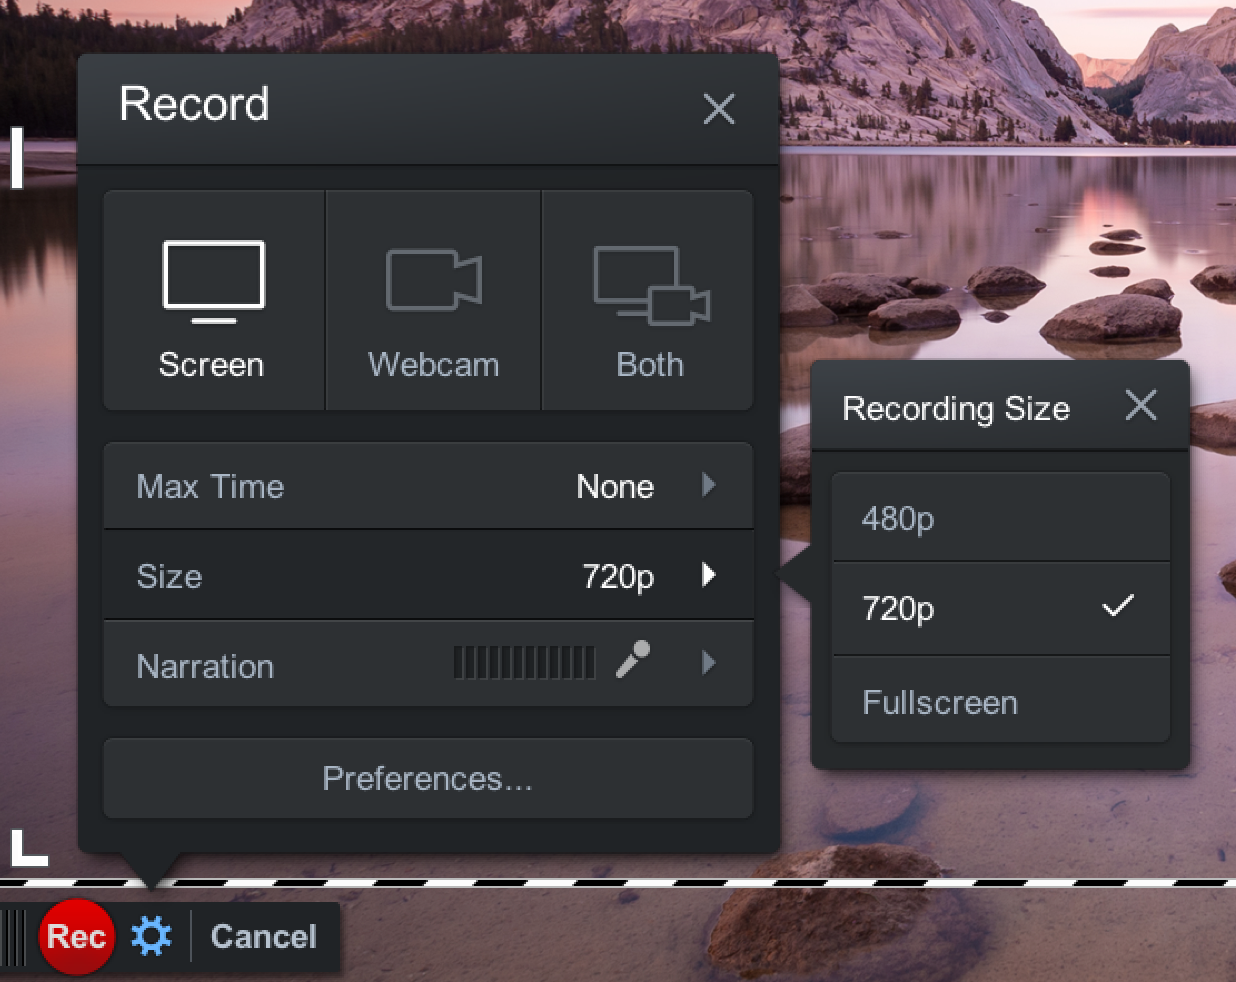
When using Screencast-O-Matic to record videos for YouTube, it's best to record in 720p rather than 420p or full screen. This means the quality will be good but also the video will be the right size on the screen. I recorded the video above in 'Full Screen', which resulted in black bars showing on either side of the video. Not the end of the world but this makes the video smaller and less professional looking.

Quick recording tip for audio:
If using an external microphone or headphone mic, check your audio settings before recording. Click 'Narration' then choose your microphone. Here I'm using my Blue Snowball mic, which is plugged into my laptop using a USB cable.
Uploading your video to YouTube
Here's another example of a screencast with me narrating while recording what I am doing on my computer screen. This video is a quick demo of how to save your recording in Screencast-O-Matic and then upload it to YouTube:
Now you have access to a worldwide audience of 1 billion YouTube users! By creating and uploading your video on YouTube, you've made a big step towards finding students to tutor online. The content of your screencast is up to you but the most important thing to remember is that it doesn't have to be perfect. I've spent hours and hours editing a 5 minute video before only to make a much better version in one take. My advice is to add a few slides to a Google Slides presentation with some information about the subject you tutor and your contact details at the end. Quickly plan what you're going to say for each slide (write a script if you need) then hit record and click through the slides as you talk. Don't worry if you have to do a few retakes or if the finished video is a bit rough round the edges. YouTube viewers are used to home made videos so it doesn't have to be super polished for a potential student to be interested and then contact you for some online tutoring.
Free Download
Need a hand getting started? Download a copy of my Google Slides screencast template and edit the text to make your own promotional screencast.
Now download a copy of Screencast-O-Matic here and have a go at recording a screencast.
You can do it!
